Getting Started with the ESnet SmartNIC framework on FABRIC
Nik Sultana, Illinois Institute of Technology
Abstract
This tutorial walks you through the process of programming an Alveo U280 card on FABRIC. We will use the P4 programming language and ESnet’s SmartNIC framework. The process that we’ll follow will be similar for other P4 programs you might create or want to use. The goal of this tutorial is to help you understand the potential role of FABRIC’s Alveos in your experiments, and how to program them.
Getting support
See FABRIC’s forum for discussing the testbed’s FPGA resources, through which you can obtain support from FABRIC and its community of users.
Accompanying materials
To help you get up and running with this tutorial, see the accompanying materials repo. This tutorial is based on a talk that was given at KNIT8, and these are the talk slides.
What are U280 cards, and why use them on FABRIC?
FABRIC’s knowledge base
Alveos are a family of network interface cards (NICs) that have substantial on-board memory and processing resources. Alveos are often described as accelerator cards or smart NICs that process data as it is arriving from the network or leaving from the host in which the Alveo is installed. In this tutorial, this processing will be network related, but the cards can be used for any type of processing.
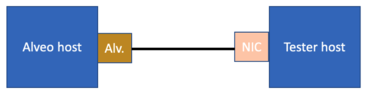
The picture below shows a topology that we’ll use in a running example. In this topology we’re connecting two hosts. Each host has a network interface; one host has an Alveo and the other host has a traditional NIC:
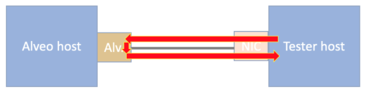
Using the Alveo, traffic can be processed independently of the Alveo’s host, as illustrated below. Usually Alveos won’t be linked to other hosts directly, but to a switch that can use Alveos for processing traffic from/to several hosts.
Since smart NICs can process network traffic in addition to forwarding it, they can have a more active role in the network. Protocols and network applications that traditionally ran on the host can run entirely in the smart NIC. They also enable a division of labor, in which smart NICs support network protocols and applications that are running on the host. This offloading of logic—and even entire protocol implementations and applications—from a host to a NIC is an old idea, and it is heavily used in applications that are latency-sensitive.
Though the idea is old, there are two features that keep it fresh and relevant. The first is that the smart NIC resources continue to increase—enabling smart NICs to process higher rates of traffic and use more complex logic. The second is that the environment continues to change—new protocols and workloads show up on the network, which creates new opportunities for applying smart NICs.
So when it comes to your research, smart NICs provide a platform on which to implement and measure new ideas—and the sky is the limit! Programmability is no longer confined to the edge of the network or control plane—you can install programs in the data plane.
The U280 is a particular model of Alveo. FABRIC has these cards distributed across many sites in the US. Each card has two 100Gbps ports and a PCIe interface to the host. It has gigabytes of onboard memory, and a large FPGA on which you can implement your processing logic. The ESnet SmartNIC framework provides a toolchain and a top-level design that you can extend to implement your processing logic—it saves you from having to implement complex logic from scratch.
In summary, you can benefit from using the U280 cards on FABRIC for the following reasons:
- Programmable networking: you can implement a custom network function that processes custom headers.
- High performance—including both high throughput and low-latency processing.
- There are several U280 cards you can use on FABRIC.
- Your experiments can benefit from the geographic span—e.g., to simulate WAN-level bandwidth and delay.
- FABRIC provides a convenient interface to configure this resource to form part of your experiment.
I also find they’re a great resource for teaching—they expose students to unfamiliar situations involving heterogeneous and distributed resources—and for sharing and demo’ing your work on a commonly-accessible platform. (Providing outsiders with access to university resources might be possible, but is usually complex.)
But there is a learning curve to programming smart NICs! This tutorial is intended to help lessen the learning curve, particularly for the smart NICs on FABRIC.
Examples of FABRIC experiments involving Alveo-based network functions
For examples of using FABRIC’s U280s in research, see these two posters that accompanied demos at KNIT8.
One example involves cybersecurity research by Hyunsuk Bang:

Another example involves network monitoring research by Prajwal Somendyapanahalli Venkateshmurthy:
Running example: In-Network Calculator
So how do we program these cards? We’ll use a simple program to drive this tutorial. The program consists of an in-network calculator. The calculation will be done on the smart NIC in response to requests that come from other hosts in the network. Thes requests use a custom protocol header.
As with any “Hello, world!” scenario, this example is clearly a toy but it helps us see end-to-end behavior without getting bogged down in unnecessary complexity. This tutorial concludes with ideas of how you can replay this end-to-end workflow on other (and more complex) in-network programs.
We’ll see the following: - Specification and parsing of custom headers. - Specifying in-network logic. - Runtime reconfiguration of this logic—we will reconfigure the calculator at runtime to map different operators to different operations. - How to drive the ESnet toolchain to compile and run this on an Alveo. - How to deploy and use this on an Alveo on FABRIC.
Big picture
If x are requests,
y are replies, and
f is a function applied to x to produce y (y = f(x)) then
we can generalize the calculator example to perform other types of functions on other types of requests. Moreover, we can switch frames between host and any of the network ports on the smart NIC.
In this example we’ll be using the topology sketched above—consisting of an Alveo node and a tester node linked together. The tester sends packets, each containing a request to perform a calculation. The Alveo card in the Alveo node transforms requests into replies, and send them back to the tester. The replies arrive containing the result.
Next we see what moves across that link. First the request:
###[ Ethernet ]###
  dst  = 06:e4:2c:4e:db:c2
  src  = e8:eb:d3:24:b1:23
  type = 0x1234
###[ P4calc ]###
    P         = 'P'
    Four      = '4'
    ignore    = 0x0
    version   = 0x1
    op        = 43
    operand_a = 3
    operand_b = 5
    result    = 3405695742
###[ Raw ]###
      load = ' '
The op field carries the ASCII code for +. From that value and the operand fields, we determine that this is a request to calculate 3 + 5. The other fields are constants.
The reply differs from the request as shown below:
###[ Ethernet ]###
  dst  = 06:e4:2c:4e:db:c2
  src  = e8:eb:d3:24:b1:23
  type = 0x1234
###[ P4calc ]###
    P         = 'P'
    Four      = '4'
    ignore    = 0x0
    version   = 0x1
    op        = 43
    operand_a = 3
    operand_b = 5
    result    = 8
###[ Raw ]###
      load = ' '
We see that the Ethernet addresses were swapped, and the result field now contains the calculation
The next sections will describe how to create this scenario on FABRIC, and use an Alveo as the in-network calculator.
Workflows
In this tutorial we encounter several workflows. Each workflow consists of a series of steps we follow to complete a task—tasks such as: develop a program, compile the program, deploy it, and test it. The learning curve can appear steep, but I’ve seen many people master it, including undergrads—deep technical knowledge is less of a prerequisite than care for details.
The workflows are organized into two environments:
- development takes place outside FABRIC—on your laptop or cluster;
- deployment takes place on FABRIC, using its Alveos.
In the remaining sections, we’ll cover the following:
- The development process, including the programming language and toolchain we’ll use.
- Allocating resources on FABRIC, including an Alveo on which we will deploy our program.
- How to deploy a program on the Alveo.
- Running and testing the program on the Alveo in FABRIC.
- Tips for diagnosis and debugging.
ESnet’s SmartNIC framework
Toolchain version
ESnet’s SmartNIC framework uses the AMD-Xilinx Vivado toolchain. The use of a particular version of ESnet’s framework must be matched with a specific version of the AMD-Xilinx Vivado toolchain. For this tutorial, I used the most recent version of the ESnet framework (as of March 2024), and version 2023.2.1 of Vivado.
Obtaining and Installing Vivado
See this guide on setting up Vivado.
The ESnet SmartNIC framework is structured into a set of components for defining the control plane and data plane behavior for a SmartNIC. These components are organized into distinct repositories. The cookbook describes how to use these components, and links to their repositories.
You use this framework by building logic that slots into a top-level design that’s later compiled onto an FPGA. The data plane’s design is outlined in this block diagram. The control plane neatly integrates with the data plane, so you can configure and reconfigure your program once it is deployed.
The P4 language
This section outlines the program that will be running on the SmartNIC to respond to calculation requests The program is written in P4, a domain-specific language for header processing. Since the Alveo’s processing is done using an FPGA, we could also use a hardware description language, but that would incur more complex development because of timing and low-level details, such as bus and memory controllers. P4 allows us to abstract those low-level details and focus on header processing.
Learning P4
The P4 website contains links to helpful learning and reference materials, including the language specification. If you’re at IIT then take a course with me—most recently P4 was taught in our graduate course on networking.
Using a hardware description language
If you prefer not to use P4, ESnet’s framework can also be used with custom RTL blocks. You can also use both P4 and custom logic through “user externs”, which the underlying AMD-Xilinx VitisNetP4 system can integrate with your P4 programs. See the the cookbook to find out more.
You can see the full source code for the calculator program online. This example originates from a set of tutorial exercises that were prepared by the P4 community. Those exercises were partly adapted for the ESnet framework for a course on programmable networking at IIT.
This section will focus on some key snippets of that code. The first P4 snippet describes the custom header that carries calculation requests and replies, and which we saw instantiated earlier:
header p4calc_t {
    bit<8>  p;
    bit<8>  four;
    bit<16> ver;
    bit<32> op;
    bit<32> operand_a;
    bit<32> operand_b;
    bit<32> res;
}
Using P4 we can describe a header stack, or the encapsulation order of headers. In our example, we stack the p4calc_t instances on those of Ethernet:
struct headers {
    ethernet_t   ethernet;
    p4calc_t     p4calc;
}
Most of the fields in our example carry constants—for example, the first two fields in the p4calc_t header will always be instantiated to “P4”.
Also, there are a fixed set of operations (e.g., “+”), and each is given a specific code.
All these constants are defined in the source code:
const bit<16> P4CALC_ETYPE = 0x1234;
const bit<8>  P4CALC_P     = 0x50;   // 'P'
const bit<8>  P4CALC_4     = 0x34;   // '4'
const bit<16> P4CALC_VER   = 0x0001; // v0.1
const bit<8>  P4CALC_PLUS  = 0x2b;   // '+'
const bit<8>  P4CALC_MINUS = 0x2d;   // '-'
const bit<8>  P4CALC_AND   = 0x26;   // '&'
const bit<8>  P4CALC_OR    = 0x7c;   // '|'
const bit<8>  P4CALC_CARET = 0x5e;   // '^'
Next we look at the program’s logic.
The snippet checks whether an incoming Ethernet frame contains the calculator header.
If that header is present, then the calculate table is consulted to map the operation to a specific action;
if that header is absent, then the frame is dropped.
if (hdr.p4calc.isValid()) {
    if (hdr.p4calc.p == P4CALC_P &&
          hdr.p4calc.four == P4CALC_4 &&
          hdr.p4calc.ver == P4CALC_VER){
        calculate.apply();
    }
} else {
    operation_drop();
}
The calculate header supports 6 actions, and it is keyed by the op field in the custom header:
table calculate {
    key = {
        hdr.p4calc.op        : exact;
    }
    actions = {
        operation_add;
        operation_sub;
        operation_and;
        operation_or;
        operation_xor;
        operation_drop;
    }
    size    = 1024;  // Table size.
    default_action = operation_drop();
}
Arithmetical operations are given meaning in P4—in this case, we use P4’s “+” operator to add the two operands:
action operation_add() {
    send_back(hdr.p4calc.operand_a + hdr.p4calc.operand_b);
}
After carrying out the calculation, actions like operation_add above call another action, send_back.
This action carries out operations that are common across all arithmetical operations—that is, updating the res field with the result, swapping over the Ethernet source and destination addresses, and setting the egress port to the value of the ingress port so the frame is returned back on the same link:
action send_back(bit<32> result) {
    bit<48> tmp;

    /* Put the result back in */
    hdr.p4calc.res = result;

    /* Swap the MAC addresses */
    tmp = hdr.ethernet.dstAddr;
    hdr.ethernet.dstAddr = hdr.ethernet.srcAddr;
    hdr.ethernet.srcAddr = tmp;

    /* Send the packet back to the port it came from */
    sn_meta.egress_port = sn_meta.ingress_port;
}
Compiling
The development cookbook explains how to compile a P4 program to form part of a bitstream.
Time needed
The compilation process takes a couple of hours. Put the kettle on.
Deploying on FABRIC
Resource permissions
Before you start the deployment, ensure that your project has the “Component.FPGA” permission. You can obtain this permission by reaching out to FABRIC support.
Experiment outline
We’ll start by setting up on FABRIC the 2-node topology described above. On the tester node, we will craft packets on the tester node. These packets contain calculation requests, and will be sent to the Alveo. The Alveo executes the program described above to produce a response for each requests. Responses are sent back to the tester node, which parses and interprets the results.
Time needed
Even if you’re simply replaying a configuration notebook, it takes several minutes to complete the deployment process because of the time needed to perform software updates, and to obtain, build and install container images.
In this example, we’ll be creating a slice that contains the elements and topology shown below.
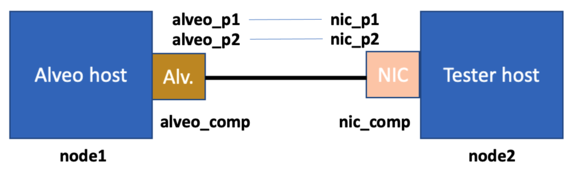
The _p1 and _p2 suffixes indicate the two network ports on the Alveo and on the NIC. These ports are linked together—therefore in reality we have two links connecting the Alveo and Tester hosts.
The creation of the slice follows the standard FABRIC approach, as shown below.
Note how we specify the component model to use an Alveo: FPGA_Xilinx_U280.
slice = fablib.new_slice(name=slice_name)

node1 = slice.add_node(name=alveo_node_name, site=site, cores=8, ram=8, disk=100, image='docker_ubuntu_20')

alveo_comp = node1.add_component(model='FPGA_Xilinx_U280', name='alveo1')
alveo_p1 = alveo_comp.get_interfaces()[0]
alveo_p2 = alveo_comp.get_interfaces()[1]

node2 = slice.add_node(name=nic_node_name, site=site, cores=8, disk=100, image='docker_ubuntu_20')
nic_comp = node2.add_component(model='NIC_ConnectX_5', name='nic1')
nic_p1 = nic_comp.get_interfaces()[0]
nic_p2 = nic_comp.get_interfaces()[1]

net1 = slice.add_l2network(name=l2bridge1_name, interfaces=[alveo_p1, nic_p1], type='L2Bridge')
net2 = slice.add_l2network(name=l2bridge2_name, interfaces=[alveo_p2, nic_p2], type='L2Bridge')

slice.submit();
Configuring the hosts
Once the slice is allocated, we then turn to configuring our hosts.
In the Alveo host we must disable a hardware isolation feature which is currently incompatible with allocation on FABRIC—this line is highlighted in the snippet below. The rest of the snippet uploads support scripts to the two nodes, and installs dependencies. One such dependency is Scapy, which is used for packet crafting on the tester host.
node1 = slice.get_node(name=alveo_node_name)
stdout, stderr = node1.execute("echo 1 | sudo tee /sys/module/vfio/parameters/enable_unsafe_noiommu_mode")
node1.upload_file("query.sh", "query.sh")
node1.execute("chmod +x query.sh")

node2 = slice.get_node(name=nic_node_name)
node2.execute("sudo apt update -y -qq && sudo apt -qq install -y build-essential && sudo apt -qq install -y net-tools && sudo apt -qq install -y python3-scapy")
result = node2.upload_file("calc.py", "calc.py")
The deployment cookbook explains the rest of the deployment process, which includes building and installing docker container images that are building blocks in ESnet’s framework:
docker image ls
REPOSITORY               TAG          IMAGE ID       CREATED      SIZE
xilinx-labtools-docker   ubuntu-dev   8a14392f5e3a   4 days ago   5.51GB
smartnic-dpdk-docker     ubuntu-dev   2e0182262b82   4 days ago   698MB
Once everything is in place, we start the container stack by running
docker compose up -d
in esnet-smartnic-fw/sn-stack.
Configuring the Alveo card
Checking your setup
For an indication of whether your setup has succeeded, run the sn-cli dev version command.
This command must be run in the smartnic-fw container—that is, from the Alveo host the full command is docker compose exec smartnic-fw sn-cli dev version.
You’ll see output structured as shown below. If the value are all ff or 00, then there was a problem with your setup—retrace your steps and look for other indications of problems.
Device Version Info
    DNA:           0x........................
    USR_ACCESS:    0x........ (..........)
    BUILD_STATUS:  0x........
Once the stack is up, we can configure the logic on the FPGA. As mentioned previously, ESnet’s framework provides a data plane design that consists of an on-chip network of resources—one of which is instantiated based on your P4 program. This network can be flexibly configured at runtime to suit a variety of use cases. In our example, we use the following configuration—the cookbook describes how to interpret this, but basically we have frames forwarded from both network ports into the P4 block, and we have the P4 block egress traffic back to either port. Here, the two ports are represented by their MAC block. You’ll also notice that we have 2 ports associated with the host, for sending and receiving traffic between the P4 program and the host, but we don’t use that path in this example.
sn-cli sw in-port-rename cmac0:cmac0 cmac1:cmac1 host0:host0 host1:host1
sn-cli sw app0-port-redirect cmac0:cmac0 cmac1:cmac1 host0:host0 host1:host1
sn-cli sw app1-port-redirect cmac0:cmac0 cmac1:cmac1 host0:host0 host1:host1
sn-cli sw bypass-connect cmac0:cmac0 cmac1:cmac1 host0:host0 host1:host1
sn-cli sw in-port-connect cmac0:app0 cmac1:app0 host0:app0 host1:app0
sn-cli sw status
sn-cli qdma setqs 1 1
sn-cli cmac enable
Finally, we check the status of the MAC and PHY blocks by using the sn-cli cmac status command.
Healthy output shows that the MAC is Enabled and the PHY is UP, in both Tx and Rx directions:
cd ~/esnet-smartnic-fw/sn-stack/ && docker compose exec smartnic-fw sn-cli cmac status
CMAC0
  Tx (MAC Enabled/RS-FEC Off/PHY UP -> UP)
  Rx (MAC Enabled/RS-FEC Off/PHY UP -> UP)

CMAC1
  Tx (MAC Enabled/RS-FEC Off/PHY UP -> UP)
  Rx (MAC Enabled/RS-FEC Off/PHY UP -> UP)
Configuring the program’s tables
Our very last configuration step concerns the program. Recall that our program relies on a table look-up to map operation symbols to actions. In this step, we populate that table:
sn-p4-cli table-insert calculate operation_add --match 0x0000002b
sn-p4-cli table-insert calculate operation_sub --match 0x0000002d
sn-p4-cli table-insert calculate operation_and --match 0x00000026
sn-p4-cli table-insert calculate operation_or --match 0x0000007c
sn-p4-cli table-insert calculate operation_xor --match 0x0000005e
Testing your program
Testing
To test the program, ssh into the tester host and run sudo python3 calc.py '3 + 5'.
To invoke the P4 program we rely on a Scapy script that produces packets that carry calculation requests, and extracts the calculation result from reply packets.
The first snippet of this Scapy script consist of the custom header—these needs to match the definition in P4, which we saw earlier:
class P4calc(Packet):
    name = "P4calc"
    fields_desc = [ StrFixedLenField("P", "P", length=1),
                    StrFixedLenField("Four", "4", length=1),
                    XByteField("ignore", 0x00),
                    XByteField("version", 0x01),
                    IntField("op", 0),
                    IntField("operand_a", 0),
                    IntField("operand_b", 0),
                    IntField("result", 0xCAFECAFE)]
The second snippet consists of code that interprets command-line expressions to extract the operationas shown below. Later it will be encoded it into the appropriate field of the header.
def op_parser(s, i, ts):
    pattern = "^\s*([-+&|^])\s*"
    match = re.match(pattern,s[i:])
    if match:
        if '+' ==  match.group(1): ts.append(0x0000002b)
        elif '-' ==  match.group(1): ts.append(0x0000002d)
        elif '&' ==  match.group(1): ts.append(0x00000026)
        elif '|' ==  match.group(1): ts.append(0x0000007c)
        elif '^' ==  match.group(1): ts.append(0x0000005e)
        return i + match.end(), ts
    raise NumParseError("Expected binary operator '-', '+', '&', '|', or '^'.")
Reconfiguring the program’s tables
Changing program behavior without recompiling it.
As an example of runtime reconfiguration of a program running on teh Alveo, we’ll swap the add and xor operations. We start by clearing the calculation table—we cannot add new rules that overlap with existing ones.
After running sn-p4-cli clear-all to clear the calculation table, we run these two commands to install the rules described above:
sn-p4-cli table-insert calculate operation_add --match 0x0000005e
sn-p4-cli table-insert calculate operation_xor --match 0x0000002b
We now see the following behavior for these calculation requests:
ubuntu@nic-node:~$ sudo python calc.py '3 + 5'
6
ubuntu@nic-node:~$ sudo python calc.py '3 ^ 5'
8
Diagnosis
ESnet’s hardware design includes several internal counters along the datapath. You can see the locations of those counters in the design diagram that was linked earlier.
We can poll those counters by using the sn-cli probe stats command.
By comparting the values of these counters, we can determine whether frames were lost at a particular stage—this might indicate that our P4 block dropped those frames.
We can also infer whether frames reached the Alveo in the first place.
We used these counters to understand unexpected behavior, and to debug network and program configurations. To work through bugs in a program, you can also use behavioral and RTL simulation – see the cookbook for more information.
The End
When you’re ready from this experiment, run
docker compose down on the Alveo host to bring down the containers,
and delete your slice as usual.
This will free up the Alveo for another FABRIC user.
Congratulations!
You’ve reached the end of this tutorial!
Here are some ideas on what to do next:
(1) Get this running on FABRIC if you haven’t already done so;
(2) Port more tutorial examples/exercises to work on the Alveo;
(3) Replace p4_only with your original code that derives from your research.
Using programmable network hardware on FABRIC will help you reap more potential from your research—to evaluate your work at scale in a high-performance environment.
Acknowledgement
These members of my group have used FABRIC and/or the ESnet framework, and directly or indirectly helped improve the materials on which this tutorial is based: Hyunsuk Bang, Sean Cummings, Pilar Fernandez Gayol, Shivam Patel, Vaneshi Ramdhony, Nishanth Shyamkumar, Mohammad Firas Sada, Laura Serrano Velazquez, Prajwal Somendyapanahalli Venkateshmurthy, Alexander Wolosewicz.
On using FABRIC or the ESnet framework, I’m indebted to the following: Ilya Baldin (JLAB), Peter Bengough (ESnet), Gordon Brebner (AMD), Dale Carder (ESnet), Mert Cevik (RENCI), Zongming Fei (UKY), Jim Griffioen (UKY), Yatish Kumar (ESnet), Tom Lehman (Virnao), Inder Monga (ESnet), Chris Neely (AMD), Anita Nikolich (UIUC), Phil Porras (SRI), Paul Ruth (RENCI), Stacey Sheldon (ESnet), Komal Thareja (RENCI), Xi Yang (ESnet), Vinod Yegneswaran (SRI).